

How to Waterproof Moroccan Bath Room
The definitive guide to creating a truly waterproof moroccan bath — covering every layer from vapour barrier to surface grout, with product recommendations, step-by-step application, and the 8 mistakes that destroy hammam rooms.
Waterproofing a Moroccan hammam room is the single most consequential technical decision in the entire build. Every beautiful tile, every layer of hand-polished tadelakt, every piece of carved marble — all of it rests on whether the waterproofing system beneath it holds. Do it right, and your hammam will outlast you. Do it wrong, and remediation will cost five times what correct waterproofing would have.
Why Waterproofing a Moroccan Hammam is Categorically Different
A standard bathroom generates humid air for perhaps 15 minutes a day. A Moroccan hammam steam room operates at 90–100% relative humidity continuously throughout every session — which may last 45–90 minutes, multiple times per day in a commercial setting. The cumulative moisture load on every surface, every grout joint, and every imperfection in the build is completely different from anything an ordinary wet room waterproofing system was designed to handle.
Three forces work against an inadequate waterproof moroccan bath installation:
Steam condensation. Unlike liquid water splash from a shower, steam rises to the ceiling and upper walls, contacts cooler surfaces, and converts back to liquid water. This condensate runs continuously down every wall surface throughout each session, saturating every grout joint and any untreated surface it reaches.
Thermal cycling. The room heats from ambient temperature (typically 18–22°C) to 40–55°C for every session, then cools again. Over thousands of sessions across years of use, this repeated expansion and contraction creates stress fractures in rigid adhesive bonds, grout joints, and any waterproofing film that cannot flex with the movement.
Vapour pressure. Steam under even the very low operating pressure of a hammam generator (0.1–0.5 bar) forces moisture molecules through microscopic imperfections in waterproofing films. A single pinhole, a missed corner joint, or an untanked ceiling panel becomes a pathway for moisture to reach the building structure — causing timber rot, masonry spalling, and mould that typically requires full demolition to remediate.
The Complete Moroccan Hammam Waterproofing Layer System
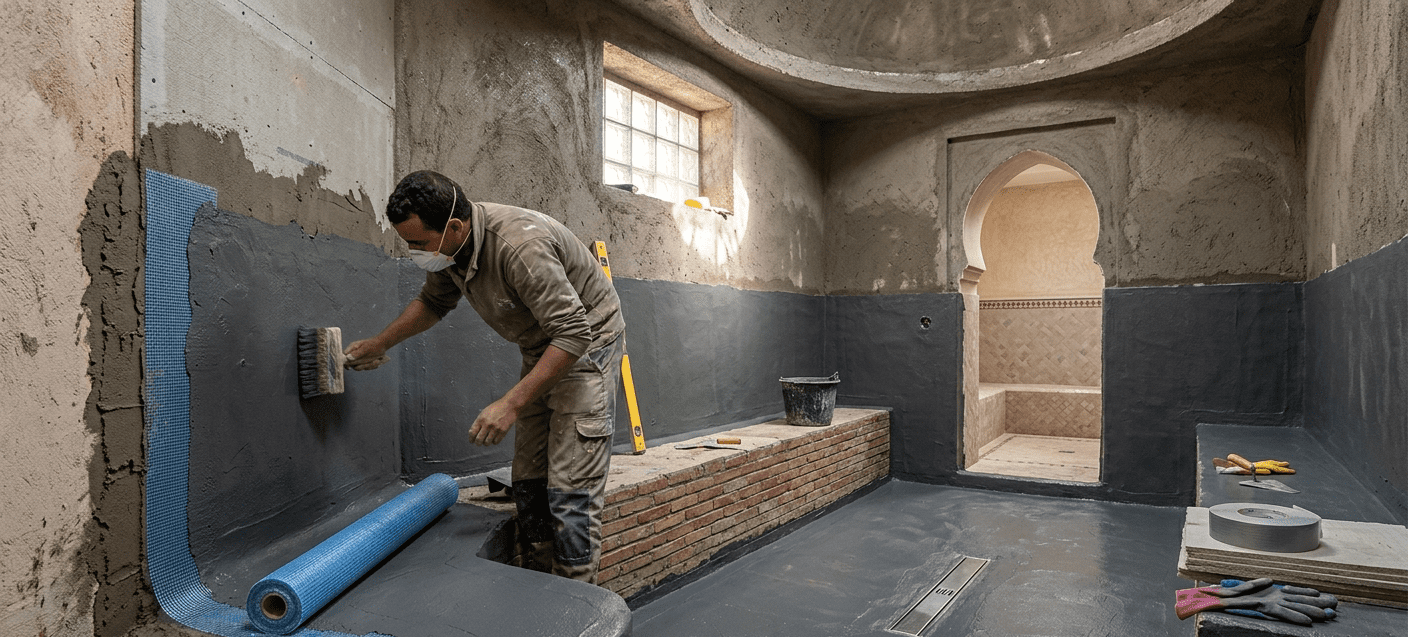
A correctly waterproofed Moroccan bath is not a single product but a complete engineered system of interlocking layers. Each layer performs a specific function. Removing any single layer reduces the system from engineered protection to a gamble. The layers are described below from the room surface inward toward the building structure.
Best Tanking Products for Moroccan Hammam Waterproofing
Not all products marketed as “wet room” or “steam room” suitable are adequate for the continuous steam environment of a Moroccan bath. The products below are consistently specified by specialist hammam waterproofing contractors for proven, long-term performance in demanding steam environments.
Mapei Mapelastic
Two-component flexible cementitious membrane. Roller or brush applied. Excellent adhesion to all common substrates. Fully compatible with Mapei tile adhesive and epoxy grout systems above.
Remmers Flex-System
Epoxy-modified two-component cementitious membrane. Outstanding adhesion to masonry and over existing tiles. Frequently used for retrofit waterproofing of existing hammam rooms.
Wedi Board System
Rigid extruded polystyrene boards with factory glass-fibre mesh facing. Acts as both insulation substrate and waterproof backer in one product. Highly efficient for wall constructions.
Schlüter Kerdi-DS
Fabric-reinforced polyethylene sheet membrane. Single-layer application with Kerdi-Fix adhesive. Industry-standard for hammam steam rooms. Kerdi-Band corner tape is the most widely used corner solution.
Substrate Preparation — The Foundation of Every Successful Waterproof Moroccan Bath
The best tanking membrane in the world will fail if applied to a poorly prepared surface. Waterproofing membranes are bridging systems, not repair mortars. They cannot fill voids, adhere to dust, or span significant cracks. Substrate preparation is not a quick sweep — it is a critical structural step that determines everything that follows.
- Concrete cure time: new concrete slabs and blockwork must cure for a full 28 days minimum before any tanking membrane is applied. Applying membrane to green concrete traps residual moisture below the film, causing bubbling and adhesion failure that is irreversible without full reapplication.
- Surface cleaning: remove all dust, oil, release agents, paint, and loose particles. Wire brush lightly contaminated surfaces; use mechanical scarification for paint or existing bonding agent residues.
- Flatness tolerance: floors must be flat to ±3 mm over any 2-metre run. Humps and hollows create unsupported tile bridges that crack under thermal movement. Use self-levelling compound to achieve flatness before tanking.
- Crack assessment: any crack wider than 0.3 mm must be chase-cut to a V-profile (6 mm wide), filled with flexible repair mortar, and covered with an anti-fracture membrane strip before the main tanking coat. Do not attempt to bridge active cracks with membrane alone.
- Suction priming: highly absorbent substrates (aerated concrete blocks, lightweight board) must be primed with a dilute PVA or dedicated tanking primer before membrane application. Rapid suction pulls the membrane’s liquid content into the substrate before it can form a continuous waterproof film.
- Existing tile check: if tanking over existing tiles, tap every tile with a coin. Any hollow-sounding tile must be removed and the void filled flush. Tanking membrane applied over a delaminating tile will fail when the tile beneath it detaches.
Installing the Vapour Barrier
The vapour barrier is installed behind and below the structural substrate — at the very back of the wall and floor construction, between the hammam build-up and the existing building fabric. It is the safety net that catches any residual moisture vapour passing through microscopic imperfections in the tanking membrane before it reaches timber, insulation, or masonry.
Floor Vapour Barrier
On concrete sub-bases, lay a minimum 500-gauge (125 micron) polythene DPM across the entire floor area before the insulation boards and screed. Overlap all sheet joints by a minimum of 300 mm and tape with vapour-resistant tape. Turn the polythene up at least 150 mm at all wall bases and lap it behind the wall vapour barrier to create a sealed envelope with no break at the floor-to-wall junction.
Wall Vapour Barrier
On stud wall constructions, fix 500-gauge polythene behind the cement board or plywood facing. On masonry walls, use a foil-faced PIR insulation board fixed against the masonry — the foil facing acts simultaneously as thermal insulation and vapour barrier, removing a separate installation step while providing better thermal performance than polythene alone.
Ceiling — The Highest-Risk Surface
The ceiling is the surface most frequently omitted from hammam vapour barrier installation. Steam rises — the dome ceiling is both the first surface that steam contacts and the coldest surface in the room (less effectively heated than floor and walls). Maximum condensation occurs at ceiling level. Every panel of the ceiling construction must include a continuous foil-faced insulation layer above the ceiling board, fully lapped and sealed at all joints, before any tanking membrane or tadelakt is applied to the room-facing surface.